
Mastering Web Components: A Comprehensive Step-by-Step Guide
If you’re looking for a more visual and interactive way to learn about the topic of this post, check out
my YouTube video on the same subject
.
Why do they exist?
#Web Components are the W3C’s answer to the rise of fronted JavaScript frameworks, where apps are divided into components that are composed together to form the UI. The classic way of developing vanilla HTML is to think in documents, so in the big picture of whole pages.
As frameworks like React and Angular require big JavaScript runtimes that every user has to download and execute, there was a need to make this component-based development style natively usable. This is why Web Components exit. I like to use them to extend existing web pages with small pieces of functionality. Oracle APEX, for example, allows you to develop plug-ins that integrate into the page. It does not force you to use Web Components, but I like to think about the components separately from the integration layer.
How do they work? - Step by step
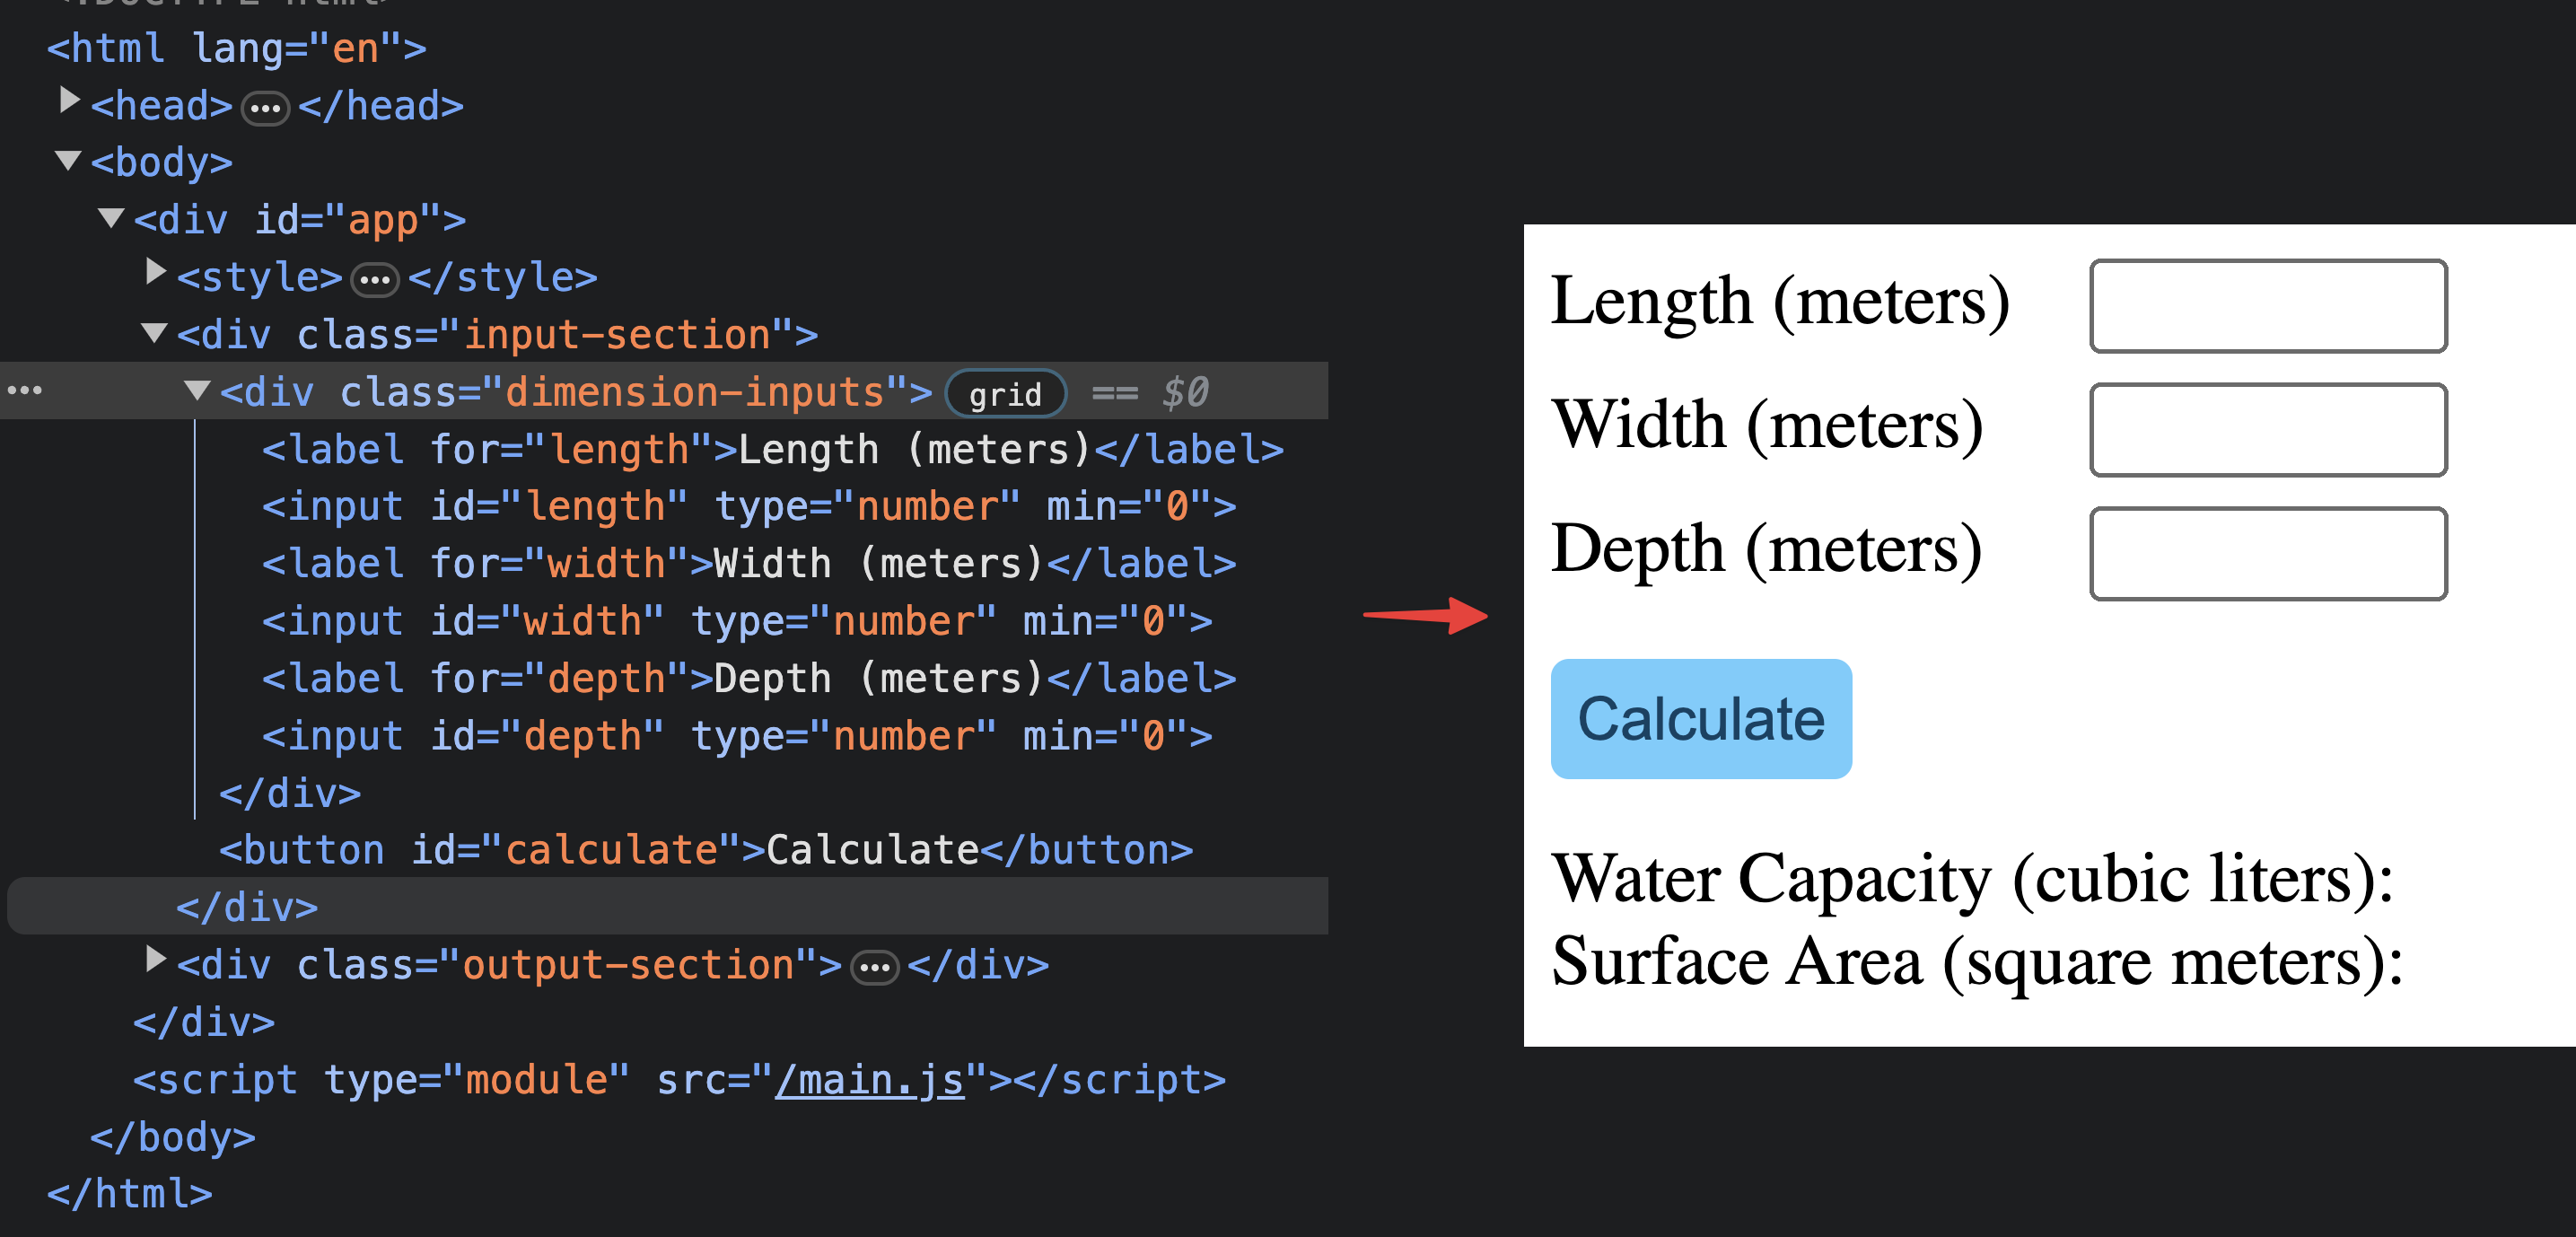
#We are developing a website for a pool repair company. On numerous pages, we need the dimensions of the customer’s pool to calculate how many materials we need and how much water we have to pump out. To not reinvent the wheel every time we need this functionality, we designed a small HTML layout that we can reuse on every page:
<style>
  .dimension-inputs {
    display: grid;
    grid-template-columns: 15ch 10ch;
    row-gap: 0.4rem;
  }
  /* ... */
</style>
<div class="input-section">
  <div class="dimension-inputs">
    <label for="length">Length (meters)</label>
    <input id="length" type="number" min="0" />
    <label for="width">Width (meters)</label>
    <input id="width" type="number" min="0" />
    <label for="depth">Depth (meters)</label>
    <input id="depth" type="number" min="0" />
  </div>
  <button id="calculate">Calculate</button>
</div>
<div class="output-section">
  <label>Water Capacity (liters): </label>
  <span id="capacity"></span>
  <br />
  <label>Surface Area (square meters): </label>
  <span id="area"></span>
</div>
How can we bundle this layout and the functionality behind it into a reusable component?
HTML Templates: Reausability
#Copying and pasting this HTML layout everywhere is not ideal. When we want to change anything, we need to go through every page and do it there manually.
Luckily, we have the <template> tag where we can store this layout and implement it anywhere we need it. We can store it directly in the HTML file or in JavaScript. We can clone it with JavaScript to use the template:
const template = document.createElement("template");
template.id = "pool-calculator-template";
template.innerHTML = `
<style>
/* ... */
</style>
<div class="input-section">
  <!-- ... -->
</div>
`;

// get the div with the id app and append the template to it
const appEl = document.querySelector("#app");
const templateClone = template.content.cloneNode(true);
appEl.appendChild(templateClone);
The HTML structure now includes a 1:1 clone of the template:
Custom elements: elegant API
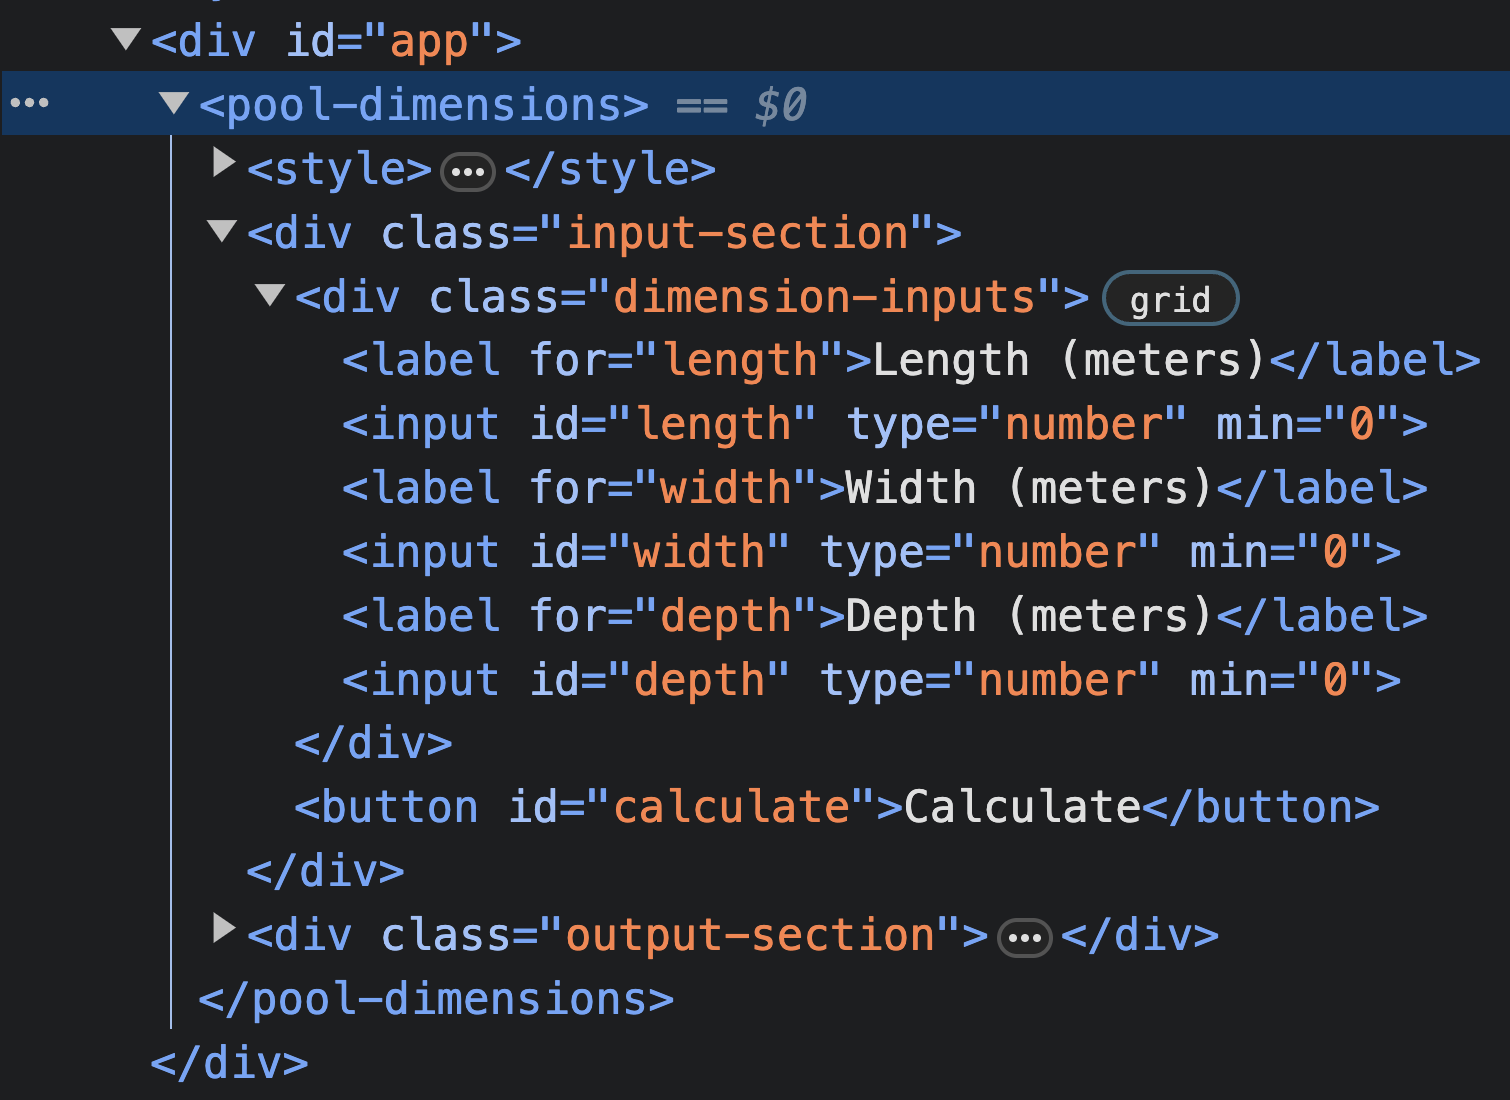
#Always running the cloneNode code works fine, but we can enhance this. We can create our own HTML element that includes the template and the cloneNode code. This way, we can use it like any other element in HTML:
<body>
  <div id="app">
    <pool-dimensions></pool-dimensions>
  </div>
</body>
To make this work, we can create a class that extends HTMLElement. In the constructor, after calling super(), we clone the template and append it to the current element (this). Finally, we define the element with customElements.define() and pass the desired name:
class PoolDimensions extends HTMLElement {
  constructor() {
    // always call super() first in the constructor
    // runs constructor of parent class
    super();
    const templateClone = template.content.cloneNode(true);
    this.appendChild(templateClone);
  }
}

customElements.define("pool-dimensions", PoolDimensions);
On the loaded page, we can see that the template is now the child content of the custom element.
Shadow DOM: Encapsulation
#We defined styles and IDs in the template. There are two scenarios where this can be a problem:
- Somewhere else on a page, the same ID or styles for the same class are used
- With multiple instances of the custom element on the same page, the IDs are duplicated and thus not unique anymore
You could argue that you can make sure to use unique classes and IDs, but Web Components are supposed to be reusable and shareable. You can’t control how other developers use your components.
To solve this problem, we can use the Shadow DOM. It is a separate DOM tree that belongs to the custom element. To use it, we have to attach it to the custom element in the constructor:
constructor() {
super();
// attach the shadow DOM to the custom element
this.shadow = this.attachShadow({ mode: "open" });
const templateClone = template.content.cloneNode(true);
// append template to the shadow DOM instead of "this"
this.shadow.appendChild(templateClone);
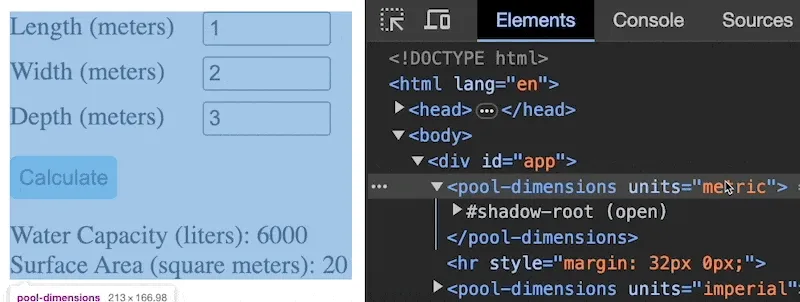
}The difference between open and closed modes is that in open mode, we can access the shadow DOM from outside the custom element. In closed mode, we are not allowed to do this.
In the browser dev tools, we can see that the template is now a child of the shadow root.

If we want to access anything inside the Shadow DOM we have to first select the shadowRoot of our custom element and then search inside it. Again this only works when the Shadow DOM is in open mode:
document.querySelectorAll("input");
// -> []

document.querySelector("pool-dimensions").shadowRoot.querySelectorAll("input");
// -> [input#length, input#width, input#depth]
The Shadow DOM also encapsulates styles. If we add CSS to the parent page like input { color: lawngreen; } we find that the styles are not applied to anything inside the Shadow DOM. You also can’t use class names defined in the parent document inside the Shadow DOM.
Interactivity and Lifecycle
#Until now, we haven’t really looked into how we can add logic to our custom element. It makes sense to also store this aspect inside the Web Component. As we are already in the JavaScript context, we can just add code to the class.
Event listener in constructor
#We want our calculate button to do something. To achieve this, we can add an event listener to it in the constructor:
class PoolDimensions extends HTMLElement {
  constructor() {
    // ...

    this.shadow
      .querySelector("#calculate")
      .addEventListener("click", this.logClick);
  }

  logClick(e) {
    console.log("clicked", e.target.textContent);
  }
}
Clean up event listener with lifecycle callback
#Like in real life, we unfortunately need to clean up after ourselves. When the component is removed from the page, we should also remove the event listener. Web components have lifecycle callbacks that automatically run at certain points in the component’s lifetime. We can use the disconnectedCallback() that is called when the element is removed from the page:
class PoolDimensions extends HTMLElement {
  constructor() {
    // ...

    this.button = this.shadow.querySelector("#calculate");
    this.button.addEventListener("click", this.logClick);
  }

  // runs when the element is removed from the page
  disconnectedCallback() {
    this.button.removeEventListener("click", this.logClick);
  }

  logClick(e) {
    console.log("clicked", e.target.textContent);
  }
}
Better add event listener in connectedCallback
#Unfortunately, there are some quirks with this approach. The constructor is called exactly once when the element is created. But when we, e.g., move an element, it actually gets disconnected and connected again. Then the disconnectedCallback runs, removing the event listener, but the constructor doesn’t run again. Now the button is not usable anymore.
We can fix this by adding the event listener in another lifecycle method instead of the constructor. The connectedCallback() is called every time the element is added to the page, unlike the constructor:
class PoolDimensions extends HTMLElement {
  constructor() {
    // it is still safe to define dom references in the constructor
    this.button = this.shadowRoot.querySelector("#calculate");
  }

  // runs when the element is added to the page
  connectedCallback() {
    this.button.addEventListener("click", this.logClick);
  }

  // runs when the element is removed from the page
  disconnectedCallback() {
    this.button.removeEventListener("click", this.logClick);
  }

  logClick(e) {
    console.log("clicked", e.target.textContent);
  }
}
My personal rule of thumb is to define variables in the constructor and run logic in the connectedCallback(). A more detailed explanation of what to care about can be found in this Stack Overflow question.
Calculation
#Now we need to add the calculation code. We can just grab the input values, calculate the area and capacity, and show the result in the output fields. We can do this in a calculate function:
constructor() {
  // ...

  // define dom references
  this.calcBtn = this.shadowRoot.querySelector("#calculate");
  this.lengthInput = this.shadowRoot.querySelector("#length");
  this.widthInput = this.shadowRoot.querySelector("#width");
  this.depthInput = this.shadowRoot.querySelector("#depth");
  this.capacityOutput = this.shadowRoot.querySelector("#capacity");
  this.areaOutput = this.shadowRoot.querySelector("#area");

  // bind the calculate method to the class
  this.calculate = this.calculate.bind(this);
}

connectedCallback() {
  this.calcBtn.addEventListener("click", this.calculate);
}

disconnectedCallback() {
  this.calcBtn.removeEventListener("click", this.calculate);
}

calculate() {
  const length = this.lengthInput.valueAsNumber;
  const width = this.widthInput.valueAsNumber;
  const depth = this.depthInput.valueAsNumber;

  const capacity = length * width * depth;
  // walls + floor
  const area = 2 * (width * depth + length * depth) + length * width;

  this.capacityOutput.textContent = capacity;
  this.areaOutput.textContent = area;
}
Notice how we redefine the calculate() method in the constructor. JavaScript and the this keyword are a confusing mess. Basically, what happens is that when we pass the method to the event listener, “this” will get overwritten by the addEventListener function to the triggering element. This results in us not being able to access the class properties anymore. To fix this, we have to bind the method to the class in the constructor. This will make sure that the this keyword will always refer to the class instance.
Component Attributes
#One powerful thing about HTML is that we can easily add attributes to elements. Some are great for reference (id), some for styling (class, style), some for validation (required) and some for configuration (type, min, max).
<input id="xyz" class="money" type="number" min="0" max="10" required />We can also add custom attributes to our custom elements. That’s great because we have some international customers who, for some reason, use their feet to measure the pool dimensions instead of a measuring tape?! We can add a units attribute to switch between both units. This can be used like this:
<pool-dimensions units="metric"></pool-dimensions>
<pool-dimensions units="imperial"></pool-dimensions>
Modify Template
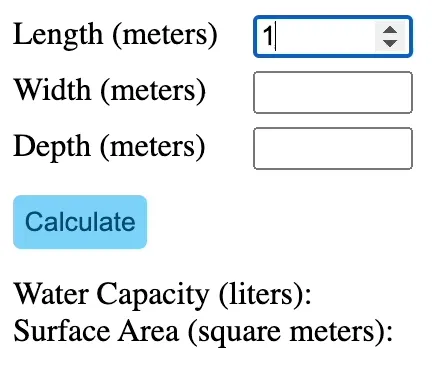
#To achieve that, we first have to change our template so we can change the units in the labels. So we add spans with classes around each unit:
<!-- ... -->
<label for="length">Length (<span class="length-unit">meters</span>)</label>
<!-- ... -->
<label for="width">Width (<span class="length-unit">meters</span>)</label>
<!-- ... -->
<label for="depth">Depth (<span class="length-unit">meters</span>)</label>
<!-- ... -->
<label>Water Capacity (<span class="capacity-unit">liters</span>):</label>
<!-- ... -->
<label>Surface Area (<span class="area-unit">square meters</span>): </label>
<!-- ... -->
Calculation
#We can now add references to the labels in the constructor. We will also call a new method setUnits() in the connected callback:
constructor() {
  // ...
  this.lengthTexts = this.shadowRoot.querySelectorAll('.length-unit');
  this.capacityText = this.shadowRoot.querySelector('.capacity-unit');
  this.areaText = this.shadowRoot.querySelector('.area-unit');
}

connectedCallback() {
  // ...
  this.setUnits();
}
This new method will check the units attribute and set the labels accordingly. We access the attribute value with the getAttribute function.
setUnits() {
  const units = this.getAttribute("units") ?? "metric";

  switch (units) {
    case "metric":
      this.isMetric = true;
      break;
    case "imperial":
      this.isMetric = false;
      break;
    default:
      console.warn(
        `[${this.getAttribute("id")}] Invalid units attribute:`,
        units
      );
      this.isMetric = true;
  }

  this.lengthTexts.forEach(
    (el) => (el.textContent = this.isMetric ? "meters" : "feet")
  );
  this.capacityText.textContent = this.isMetric ? "liters" : "gallons";
  this.areaText.textContent = this.isMetric ? "square meters" : "square feet";

  // recalc
  this.calculate();
}
Additionally, we need to modify the water capacity calculation, as these people again use another unit called gallons (1000 of that unit don’t equal one cubic other unit; it’s strange). Fortunately, the area calculation is the same for both units, as it is just square unit in both cases:
calculate() {
    // ...

    if (isNaN(capacity) || isNaN(area)) {
      return;
    }

    if (!this.isMetric) {
      // Convert cubic meters to gallons
      this.capacityOutput.textContent = (capacity * 0.2642).toFixed(1);
    } else {
      this.capacityOutput.textContent = capacity;
    }
    this.areaOutput.textContent = area;
  }
Reactivity
#Currently, the units are defined at component creation and cannot be changed afterward. As our users are very indecisive, we need to allow them to switch their preferred units at any time. Luckily, this is not a problem for Web Components.
We first need to define which attributes should be observed for changes. We can just define a static getter observedAttributes that returns an array of attribute names:
class PoolDimensions extends HTMLElement {
  static get observedAttributes() {
    return ["units"];
  }

  // ...
}
Then we can use another lifecycle method called attributeChangedCallback. It receives the name of the changed attribute, the old value, and the new value. We can just call setUnits() when the unit is changed. We don’t need to pass anything, as the method will just read the attribute value again:
attributeChangedCallback(name, oldValue, newValue) {
  switch (name) {
    case "units":
      this.setUnits();
      break;
    default:
      console.warn(
        `[${this.getAttribute("id")}] Unhandled attribute change:`,
        name
      );
  }
}
Now when we change the attribute value the setUnits() method will be called and the labels will be updated and a recalculation triggered.
Changing attributes from JavaScript
#We can also change the attribute value dynamically in JavaScript. We need to query our custom element and then use the setAttribute() method:
const el = document.querySelector("pool-dimensions");
el.setAttribute("units", "metric");
el.getAttribute("units"); // 'metric'
Properties
#This part is unfortunately a bit confusing. Next to attributes, there is another way to pass data to a component. This method is called properties.
Properties vs Attributes
#Property values are not reflected in the DOM / HTML. You can only set them via JavaScript. Attributes only allow you to pass strings. The benefit of properties is that you can pass any JavaScript value to the component. This is useful for objects or arrays.
You could theoretically convert an object to a string, pass it as an attribute, and parse it back again in the component. But this approach is not ideal and looks horrible in the DOM.
The JavaScript API is fairly simple. You can access the properties literally via JavaScript properties (. operator) of the element:
const el = document.querySelector("pool-dimensions");
el.data = {
  length: 2,
  width: 3,
  depth: 4,
};
console.log(el.data.length); // 2
Accessing porperties inside the component
#Accessing the passed value is fairly simple, as the values are literally just properties on this:
connectedCallback() {
  /// ...
  if (this.data) {
    const { length, width, depth } = this.data;
    this.lengthInput.value = length;
    this.widthInput.value = width;
    this.depthInput.value = depth;
    this.calculate();
  }
}
You might also want to retrieve the current value of the inputs from outside after the user changes the inputs. We just have to define a getter function called get {propertyName}() that returns the current values:
get data() {
  return {
    length: this.lengthInput.valueAsNumber,
    width: this.widthInput.valueAsNumber,
    depth: this.depthInput.valueAsNumber,
  };
}
We can also achieve reactivity by defining a setter:
set data({ length, width, depth }) {
  this.lengthInput.value = length;
  this.widthInput.value = width;
  this.depthInput.value = depth;
  this.calculate();
}
Syncing properties and attributes
#If we somehow forget that units is an attribute instead of a property, we can easily get confused, as the same key can have different values:
const el = document.querySelector("pool-dimensions");
el.getAttribute("units"); // 'metric'
el.units = "imperial";
el.units; // 'imperial'
el.getAttribute("units"); // 'metric'
We can keep both in sync by defining getters and setters for an attribute:
set units(value) {
  // if observed this will call attributeChangedCallback
  this.setAttribute("units", value);
}

get units() {
  return this.getAttribute("units");
}
But I prefer to do better documentation of my component to make it clear which values are attributes and which are properties than to add a hack.
Slots: passing child elements to a component
#(From this point I won’t use the pool example anymore as it’s not fitting for the topic)
If you want to build a modal dialog UI component, you don’t care about the content of the modal. You just want to give it a title and some content. This is where slots are practical, which allow you to pass child elements to a component. You can define a slot in your template:
<dialog open>
  <header class="dialog-header">Title</header>
  <main class="dialog-content">
    <slot name="content"></slot>
  </main>
  <footer class="dialog-footer">
    <button>Cancel</button>
  </footer>
</dialog>
And now, you can pass content to your custom component:
<my-dialog>
  <div slot="content">
    <p>Some content</p>
    <ul>
      <li>Some</li>
      <li>Content</li>
    </ul>
  </div>
</my-dialog>
You can also dynamically pass content with JavaScript:
const dialogContent = document.createElement("div");
dialogContent.textContent = "Some content";
dialogContent.setAttribute("slot", "content");

const dialogEl = document.querySelector("my-dialog");
dialogEl.appendChild(modalContent);
As you can name slots you are even able to define multiple slots in your component.
Private and public methods
#We want to open the dialog from outside the component, as we would like to bind the modal to a button. We could update the attribute on the component, but we can even call the open function from the outside. Any methods defined inside the component are public by default:
// inside the component
////////////////////////
open() {
  this.dialogEl.setAttribute("open", "");
}
////////////////////////


// outside the component / main page
////////////////////////
const dialog = document.querySelector('my-dialog');

btn.addEventListener('click', () => {
  dialog.open();
});
////////////////////////
We can make methods private by prefixing them with a #:
// inside the component
////////////////////////
#privateMethod() {
  console.log("private method");
}
////////////////////////


// outside the component / main page
////////////////////////
const dialog = document.querySelector('my-dialog');
dialog.#privateMethod();
// error:
// Uncaught SyntaxError: Private field '#privateMethod' must be declared in an enclosing class
////////////////////////
Conclusion
#I think Web Components are really useful and a great innovation in vanilla web development. But I still have some things that I don’t like about them. I will write about them in a future blog post and also show how development can be easier with some frameworks.
You can find all the demos on GitHub.