SvelteKit 1 with SQLite: Displaying, Changing and Searching Data
If you’re looking for a more visual and interactive way to learn about the topic of this post, check out
my YouTube video on the same subject
.
A perfect match
#SvelteKit 1.0 released in December 2022. As it now has a stable API I took a peek at how data-driven applications can be built with it. I am impressed by its simplicity and how fast you can achieve great results.
Together, SvelteKit and SQLite make a great combo because they both have a small footprint and are easy to set up and use. SQLite can be easily integrated into a SvelteKit application, allowing developers to easily store and retrieve data in a structured way, making it easy to build CRUD web applications.
SQLite is serverless (not the new cloud buzzword) meaning that it runs within the same process from the consuming application. Traditional relational client/server databases like MySQL or Postgres run in their own process and lead to the burden of having to maintain them. This approach can have big advantages if you have a high amount clients directly connecting to the database. In our SvelteKit app approach, this is not the case, as only the SvelteKit backend is directly accessing the database.
My setup
#I use SvelteKit in combination with TypeScript and highly recommend you do this as well. We can type our data shapes in the backend and later reuse them in the frontend to safely access the data in the UI and make our lives easier in case of type changes.
I will use better-sqlite3 as the Node.js SQLite driver as I like its synchronous API.
Instead of setting up a schema with data myself, I used the chinook sample database that includes music data with tables like artists, albums, and tracks.
Display all tracks
#The example database has a table called tracks. We will query this table to display the first 50 tracks on our home page.
Setting up the database
#As the database file only sits on the server, we can create the main DB file in lib/server. lib is the place to put your code that does not strictly belong to any route and can be imported with the $lib prefix.
Any code in the server subfolder cannot be imported in the frontend. So any code in there is hidden from the eyes of the users. You can read more about the project structure in the docs.
I created another subfolder db with an index.ts. We can import Database from better-sqlite3 and use its constructor to start our database. Afterward, we can outsource the path to my database file in a .env file with the content DB_PATH=./data/chinook.db.
We start with the function getInitialTracks that just returns the first 50 tracks from the corresponding table. I store the query in a variable and later call db.prepare with it. The prepared statement can then be executed with the .all function as we want to get multiple rows. This function also receives an object of the parameters we want to bind to the query. In our case, this is the limit amount we can now provide as a function parameter. We don’t want to manually concatenate that input into the SQL-Query as this can lead to nasty SQL-Injection vulnerabilities. The whole file now looks like this:
import Database from 'better-sqlite3';
import { DB_PATH } from '$env/static/private';
import type { Track } from './types';

const db = new Database(DB_PATH, { verbose: console.log });

export function getInitialTracks(limit = 50): Track[] {
  const sql = `
  select t.TrackId as trackId
  , t.Name as trackName
  , a.AlbumId as albumId
  , a.Title as albumTitle
  , at.ArtistId as artistId
  , at.Name as artistName
  , g.Name as genre
from tracks t
join albums a
 on t.AlbumId = a.AlbumId
join artists at
 on a.ArtistId = at.ArtistId
join genres g
 on t.GenreId = g.GenreId
limit $limit
  `;
  const stmnt = db.prepare(sql);
  const rows = stmnt.all({ limit });
  return rows as Track[];
}
As I used TypeScript we also need to add a definition for our Track type. I created a types.ts next to the database index.ts with the following content:
export type Track = {
  trackId: number;
  trackName: string;
  albumId: number;
  albumTitle: string;
  artistId: number;
  artistName: string;
  genre: string;
};
Enriching the page with the data
#To show the data on our home page we need to create a +page.server.ts in src/routes. In there we can add a load function that simply returns the data of our function:
import { getInitialTracks } from '$lib/server/db';
import type { PageServerLoad } from './$types';

export const load = (() => {
  const tracks = getInitialTracks();

  return {
    tracks,
  };
}) satisfies PageServerLoad;
These few lines are enough for us to consume the data in our frontend svelte file. In the neighboring +page.svelte we can consume and display the data:
<script lang="ts">
	import type { PageData } from './$types';
	export let data: PageData;
<script />

<h1 class="is-size-1">Tracks</h1>

	<table class="table">
		<thead>
			<tr>
				<th>Track</th>
				<th>Artist</th>
				<th>Album</th>
				<th>Genre</th>
			</tr>
		</thead>
		<tbody>
			{#each data.tracks as track}
				<tr>
					<td>{track.trackName}</td>
					<td>{track.artistName}</td>
					<td>{track.albumTitle}</td>
					<td>{track.genre}</td>
				</tr>
			{/each}
		</tbody>
	</table>
As I included bulma to get some modern initial styles the result looks the following:

Album route
#A neat addition to the app is an album details page that shows some basic information about any album with a tracklist.

Creating the route
#As SvelteKit uses a filesystem-based router we can create new folders to allow for an album detail route. Inside src/routes we can create album/[albumId]. We put the albumId in squared brackets so that SvelteKit treats this as a parameter so that different content is loaded for different IDs.
In the newly created folders, we can add empty +page.server.ts and +page.svelte files.
Database functions
#Back in our database index.ts we can add following two functions for the new page:
export function getAlbumById(albumId: number): Album {
  const sql = `
  select a.AlbumId as albumId
     , a.Title as albumTitle
     , at.ArtistId as artistId
     , at.Name as artistName
  from albums a
  join artists at on a.AlbumId = at.ArtistId
 where a.AlbumId = $albumId;
  `;
  const stmnt = db.prepare(sql);
  const row = stmnt.get({ albumId });
  return row as Album;
}

export function getAlbumTracks(albumId: number): AlbumTrack[] {
  const sql = `
  select t.TrackId as trackId
     , t.Name as trackName
     , t.Milliseconds as trackMs
  from tracks t
 where t.AlbumId = $albumId
order by t.TrackId
`;
  const stmnt = db.prepare(sql);
  const rows = stmnt.all({ albumId });
  return rows as AlbumTrack[];
}
In the types.ts file, we then add the newly used types:
export type Album = {
  albumId: number;
  albumTitle: string;
  artistId: number;
  artistName: string;
};

export type AlbumTrack = {
  trackId: number;
  trackName: string;
  trackMs: number;
};
Page load function
#In the new +page.server.ts file, we can then define our load function. We can receive the albumId of the URL from the params object. The value is named the same as we defined in the folder name ([albumId]).
export const load = (({ params }) => {
  const albumId = parseInt(params.albumId);

  const album = getAlbumById(albumId);
  const tracks = getAlbumTracks(albumId);

  return {
    album,
    tracks,
  };
}) satisfies PageServerLoad;
Page layout
#It is now trivial to display the loaded data on the page:
<script lang="ts">
  import type { PageData } from './$types';
  export let data: PageData;
</script>

<div class="px-4">
  <h1 class="is-size-1">{data.album.albumTitle}</h1>
  <p class="is-size-4">By {data.album.artistName}</p>

  <table class="mt-6 table">
    <thead>
      <tr>
        <th>#</th>
        <th>Track</th>
        <th>Duration</th>
      </tr>
    </thead>
    <tbody>
      {#each data.tracks as track, i}
      <tr>
        <td>{i + 1}</td>
        <td>{track.trackName}</td>
        <td>{Math.floor(track.trackMs / 1000)} s</td>
      </tr>
      {/each}
    </tbody>
  </table>
</div>
Error handling
#We call our album route with any non-existing album ID we get a default unstyled error page that says “500 Internal Error”.
The 500 error code is not great as 404 “not found” would be better as the error was caused by an unknown album ID. We can manually fix this by adding error handling mechanisms in our +page.server.ts. We can check after parsing the parameter as an integer if we have any value left as parsing only characters would result in no value. If this is the case we can throw the error function provided by SvelteKit. We can then define our wanted HTTP code and the message. We do the same when our database function still returns without a value:
import { error, type Actions } from '@sveltejs/kit';

export const load = (({ params }) => {
  const albumId = parseInt(params.albumId);

  if (!albumId) {
    throw error(404, 'Album not found');
  }

  const album = getAlbumById(albumId);

  if (!album) {
    throw error(404, 'Album not found');
  }

  const tracks = getAlbumTracks(albumId);

  return {
    album,
    tracks,
  };
}) satisfies PageServerLoad;
We may want this error page to match our page style or add more information. We can achieve this by adding a +error.svelte file next to the page file. Note that we could also create a global error file as SvelteKit will use the closest file while traversing up the file tree.
For a really simple page, we can just display the HTTP status code and a message by importing both from the page store:
<script>
  import { page } from '$app/stores';
</script>

<h1 class="is-size-1 has-text-danger">Ooopsie Whooopsie</h1>
<p>{$page.status}: {$page?.error?.message}</p>
The result looks the following:

Update an album name
#To cover sending data to the backend to write data back to the database I decided to allow updating the album name.
Database operation
#We have to extend our database functions again with a new one that runs the update statement. We only need our primary key column, the AlbumId, and the new value for the Title column. We can add a prepared statement as before and pass the values as an object:
export function updateAlbumTitle(albumId: number, albumTitle: string): void {
  const sql = `
  update albums
     set Title = $albumTitle
   where AlbumId = $albumId
`;
  const stmnt = db.prepare(sql);
  stmnt.run({ albumId, albumTitle });
}
User Interface
#The easiest way to send data to the backend and start an operation is by utilizing forms. We can add one to the album page and set the HTTP method to POST instead of GET as this makes sense for writing operations.
We add a hidden input field for the album ID that is prefilled by our load data. Additionally, we create a text input field for the new album title. Both items need the name property so we can access the values later on.
We can then add a button that submits the form. We can add the formaction property and set a function name that is then triggered in the +page.server.ts file. This way we can do different operations based on a single form (e. g. Create, Update, Delete). Note that we prefix the function name with a question mark and slash to make it a relative path.
<!-- ... -->
<h2 class="is-size-3 mb-4 mt-6">Update Album Name</h2>
<form method="post">
  <input
    class="input"
    type="text"
    name="albumTitle"
    value="{data.album.albumTitle}"
    style="max-width: 50ch;"
  />
  <input type="hidden" name="albumId" value="{data.album.albumId}" />
  <button
    class="button is-primary"
    type="submit"
    formaction="?/updateAlbumTitle"
  >
    Update
  </button>
</form>
Handle form submission
#We can now handle the form submission in our +page.server.ts file. For that, we create a const called actions. In there we define a function called the same as our formaction attribute on our button.
We can access the form data by calling request.formData() and then grab the values by their name. Now we call our database function and pass the values:
export const actions: Actions = {
  updateAlbumTitle: async ({ request }) => {
    const data = await request.formData();

    const albumIdStr = data.get('albumId')?.toString();
    const albumId = albumIdStr ? parseInt(albumIdStr) : null;

    const albumTitle = data.get('albumTitle')?.toString();

    if (!(albumId && albumTitle)) {
      throw error(400, 'AlbumId or AlbumTitle missing');
    }

    updateAlbumTitle(albumId, albumTitle);
  },
};
You may want to look into
form validation with Zod
as this makes it easier to validate the data and return errors to the user.
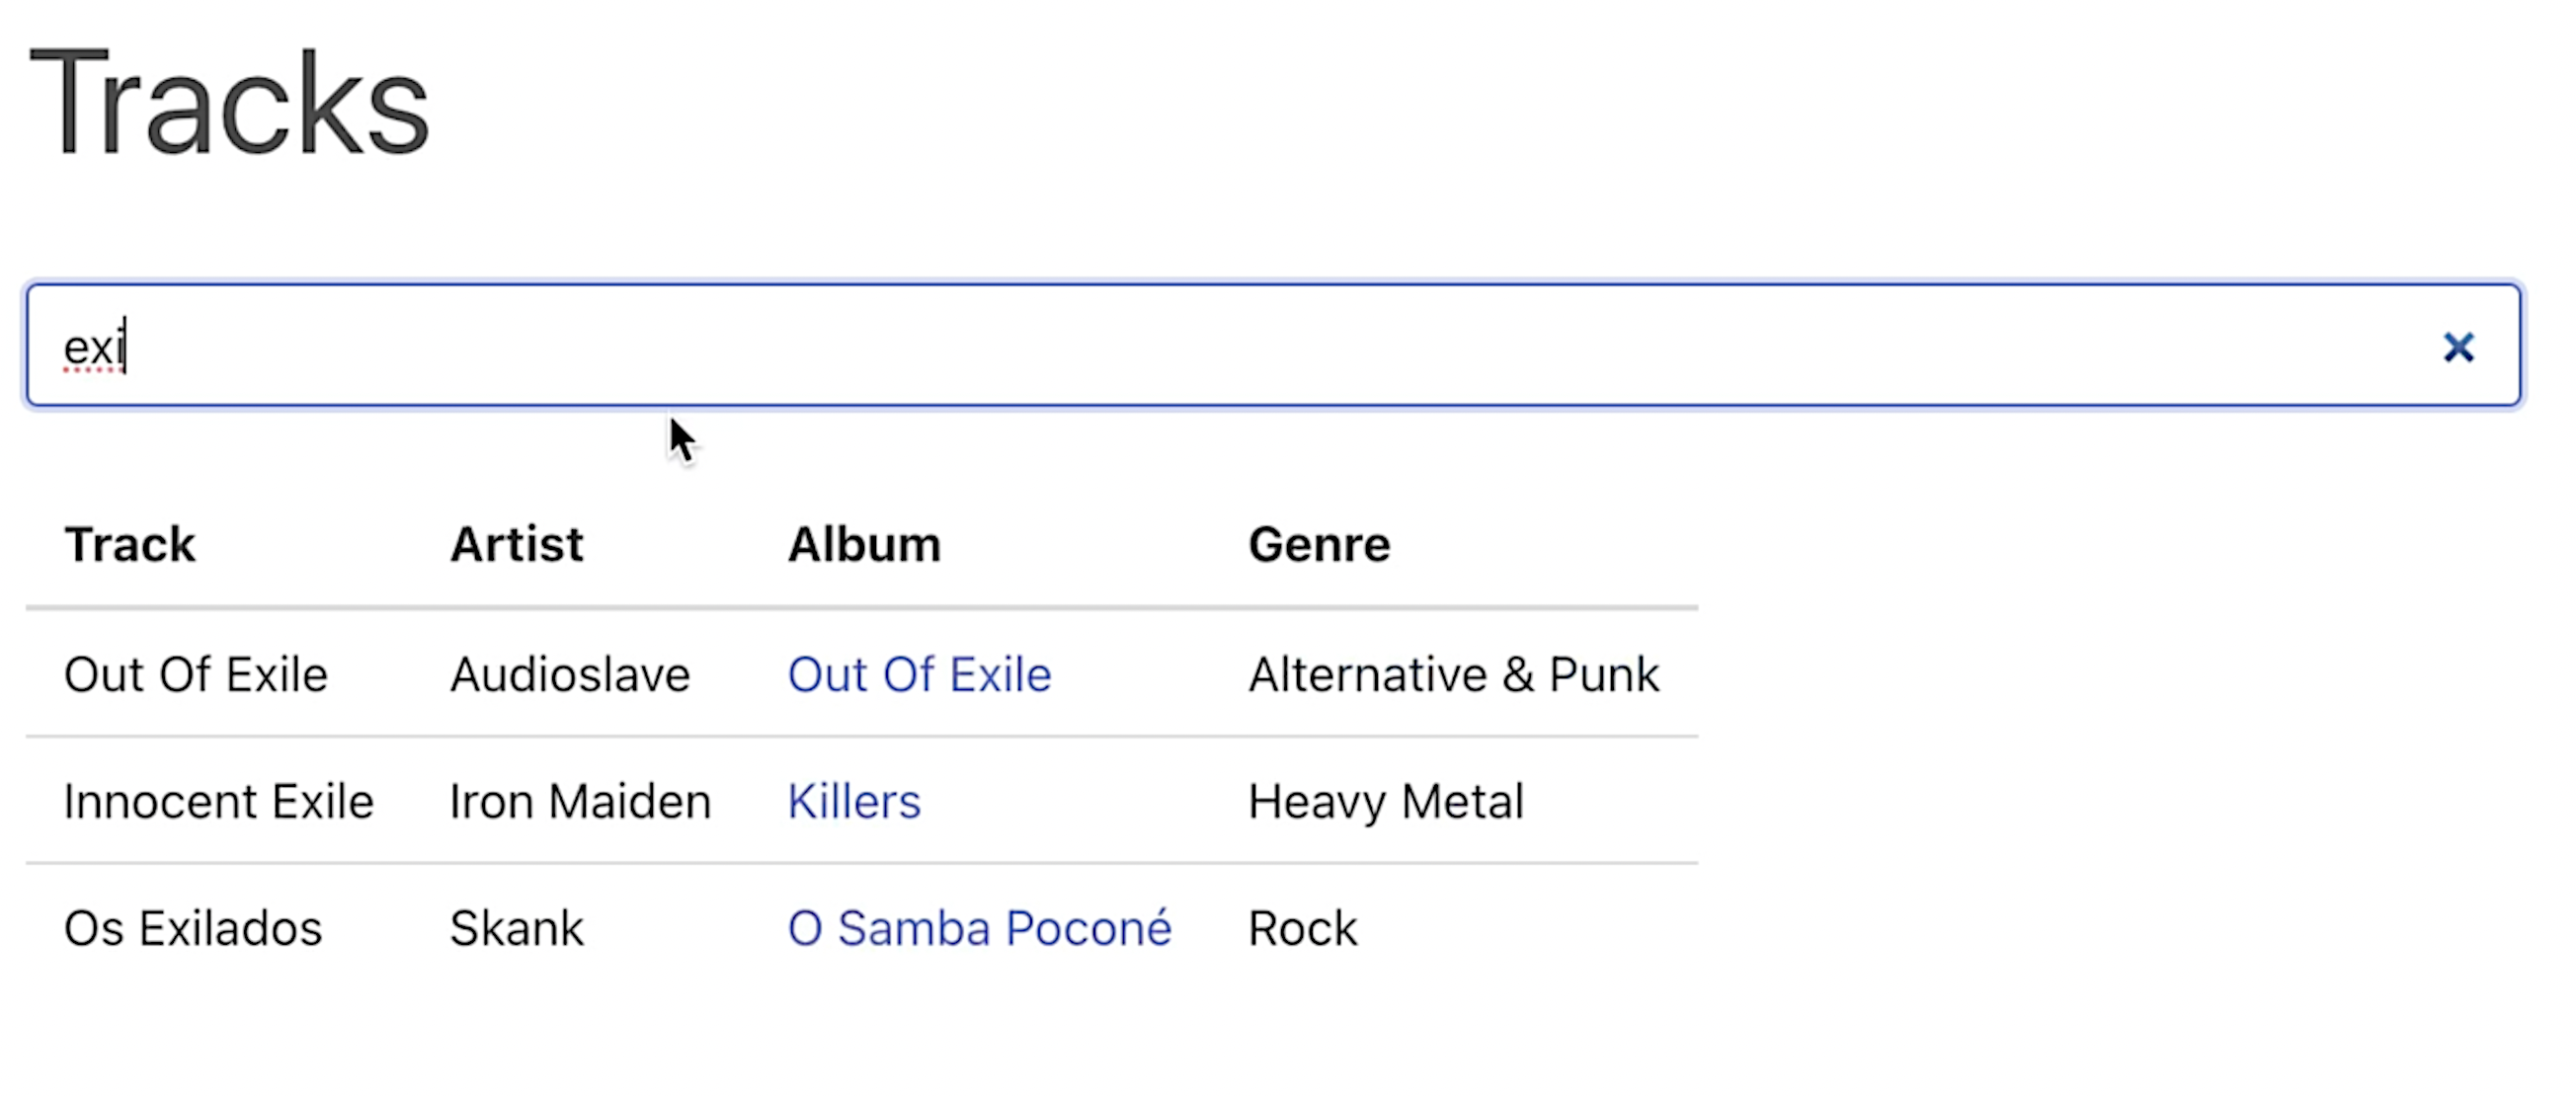
Make tracks searchable
#Back on our home page, we want to make the tracks searchable. I think the most user-convenient way is to implement a search while you type. So this time we can not use any load function as we have to send a request to our backend while the user types and not on the initial page load.
Database function
#We have to create a new DB function that takes a search term. We can then use the like operator to search for the term in the track name. By using the lower function to make the search case insensitive:
export function searchTracks(searchTerm: string, limit = 50): Track[] {
  const sql = `
  select t.TrackId as trackId
  , t.Name as trackName
  , a.AlbumId as albumId
  , a.Title as albumTitle
  , at.ArtistId as artistId
  , at.Name as artistName
  , g.Name as genre
from tracks t
join albums a
 on t.AlbumId = a.AlbumId
join artists at
 on a.ArtistId = at.ArtistId
join genres g
 on t.GenreId = g.GenreId
where lower(t.Name) like lower('%' || $searchTerm || '%')
limit $limit
  `;
  const stmnt = db.prepare(sql);
  const rows = stmnt.all({ searchTerm, limit });
  return rows as Track[];
}
API route
#So instead of calling the new function in our load, we can make use of API routes. These endpoints don’t support any page and thus need to be called +server.ts (instead of +page.server.ts). I think it makes sense to create an api folder so my API route sits in src/routes/api/searchTracks/+server.ts.
We can create a function GET as we want it to be triggered by the HTTP GET method. The search term should be passed as a query parameter. We can access it by calling url.searchParams.get('searchTerm')?.toString();. If there is no search term we can return the initial tracks. Otherwise, we can pass our array to the json function and return it.
import { getInitialTracks, searchTracks } from '$lib/server/db';
import type { Track } from '$lib/server/db/types';
import { json } from '@sveltejs/kit';
import type { RequestHandler } from './$types';

export const GET = (({ url }) => {
  const searchTerm = url.searchParams.get('searchTerm')?.toString();
  console.log('searchTerm', searchTerm);

  let tracks: Track[] = [];

  if (!searchTerm) {
    tracks = getInitialTracks();
  } else {
    tracks = searchTracks(searchTerm) ?? [];
  }

  return json(tracks);
}) satisfies RequestHandler;
Search input
#We add an input of type search to our home page. We can then add an on:keyup and on:search event listener. The on:keyup event is triggered on every key press. The on:search event is triggered when the user presses the enter key or clicks the ‘x’ to reset the input:
<input
  type="search"
  placeholder="Search..."
  class="input mb-5"
  style="max-width: 80ch;"
  value="{searchTerm}"
  on:keyup="{handleSearch}"
  on:search="{handleSearch}"
/>
Then handleSearch function receives the event and we can access the input value by calling e.target.value. I recommend to debounce the search to throttle the number of requests send to the server. So we don’t actually filter while the user types, only after he has not typed in 300 ms. We can do this by using timeouts.
The real request is done in the fetchTracks function. It uses the fetch API to make a GET request to our API route. We pass the search term as a query parameter. After the request is done we can parse the response as JSON and set the result to the new tracks variable.
<script lang="ts">
  // ...
  let timer: NodeJS.Timeout;
  let searchTerm = '';
  function fetchTracks() {
    fetch(`/api/searchTracks?searchTerm=${searchTerm}`)
      .then((res) => res.json())
      .then((data) => {
        tracks = data;
      });
  }
  function handleSearch(e: Event) {
    clearTimeout(timer);
    timer = setTimeout(() => {
      const target = e.target as HTMLInputElement;
      searchTerm = target.value;
      fetchTracks();
    }, 300);
  }
  let tracks = data.tracks;
</script>
We still need to change the table loop to accessing the tracks variable instead of data.tracks so that it updates after a search:
{#each tracks as track}
	<tr>
		<td>{track.trackName}</td>
		<td>{track.artistName}</td>
		<td><a href={`/album/${track.albumId}`}>{track.albumTitle}</a></td>
		<td>{track.genre}</td>
	</tr>
{/each}
Now we are done and can search for tracks. You can find the final code on GitHub. Let me know in the comments if you build something with SvelteKit and SQLite and if you like the combination,